
No-Bake Halloween Oreo Fudge
There is one recipe that we always make for Halloween that everyone loves. This three-ingredient Halloween Oreo Fudge has become a family tradition. Once you try it, it will become your family’s favorite new holiday treat as well. Since it takes only a few minutes to prepare, I usually make a few batches to give as gifts for neighbors, family, teachers, or pass them out to trick-or-treaters.
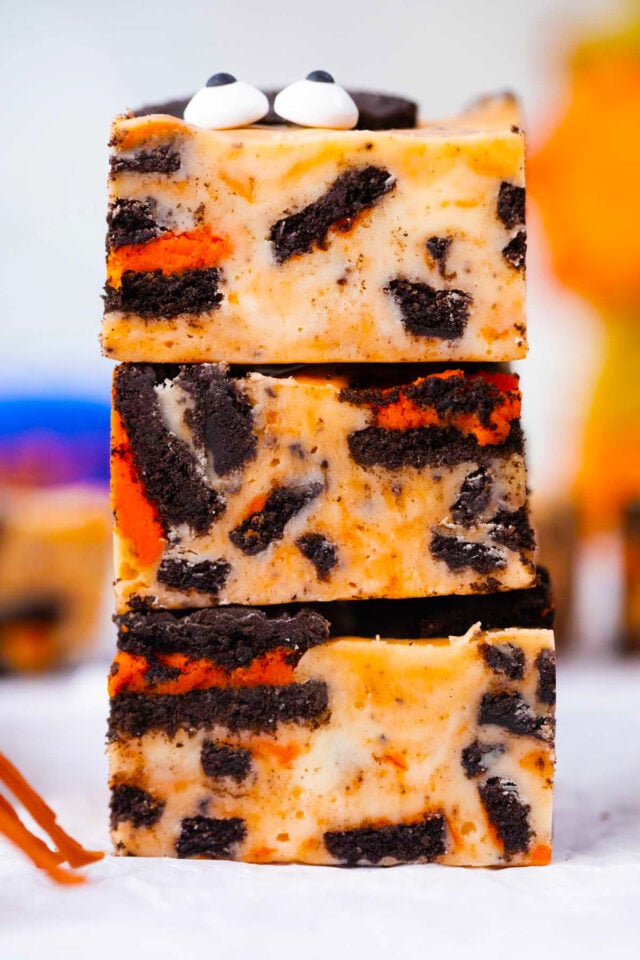
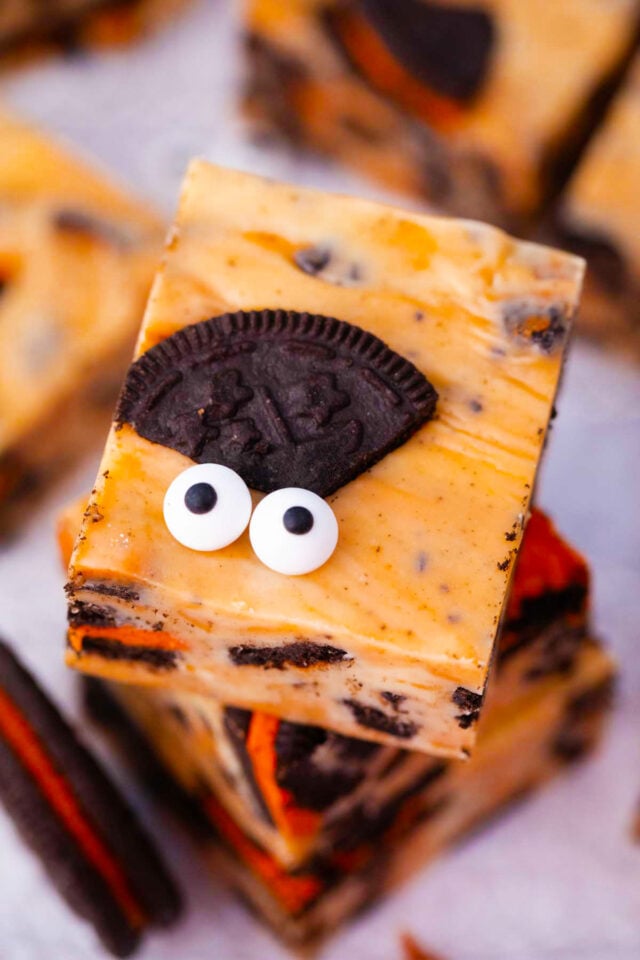
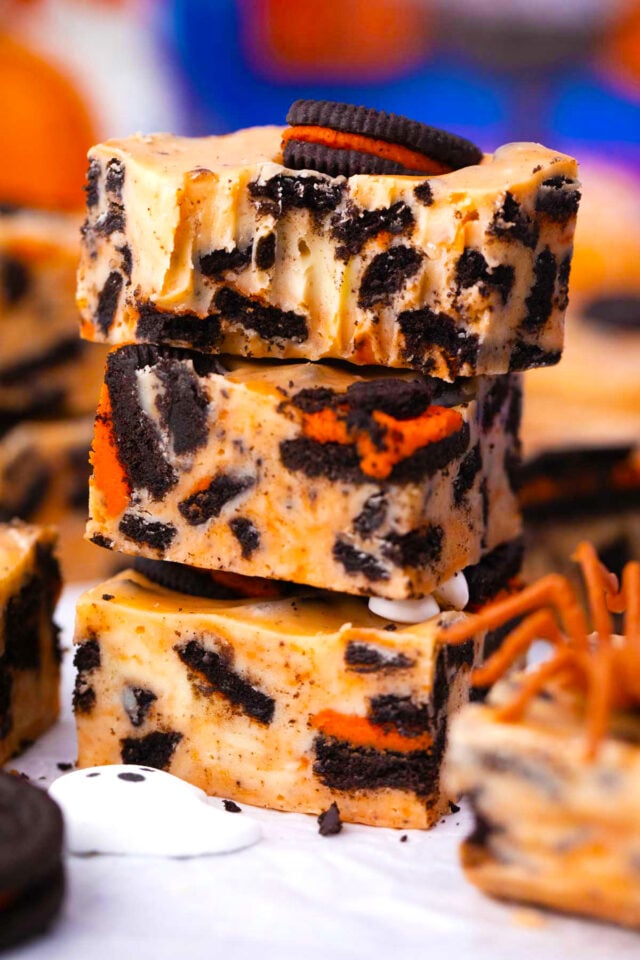
This Halloween-themed dessert is sure to be a hit at your party or work gathering. And because it only has a few ingredients, it is inexpensive enough to make in large quantities. From my experience, this treat is always a success; the fudge is tender and smooth, and the Oreos remain just a bit crunchy, adding some texture. The best part? You can decorate it as you want, with eyeballs, sprinkles, nuts, gummy worms, or chocolate spiders! I serve them with dirty matcha, as it resembles a witchy drink!
Table of contents
This no-bake recipe is also ideal for making in advance, as it can be stored at room temperature for up to two weeks or even longer in the refrigerator. I usually make it a few days ahead or the night before a fall-themed party. I also like to wrap it up in Halloween-colored plastic wrap when I take it to potlucks and include a recipe card so anyone can make it at home.
Why you will love this recipe
- Three ingredients: With just a few ingredients, this luxurious dessert can be made for under $10. It also means that shopping is easy. This is the ideal recipe to make with kids!
- Easy to make: There are only three easy steps to making my scrumptious fudge. I wanted it to be as easy as possible. Just melt, pour, and chill.
- Make extras to serve a crowd: Since it is so easy to make, I usually double the recipe for a large batch. I love to make extras to give instead of candy for Halloween.
- Pass it out as gifts: The kids love this fudge, so I usually keep it on hand in October. Whenever we host playdates, I make goodie bags and include this Halloween fudge; it’s always such a pleasant surprise!
What you will need
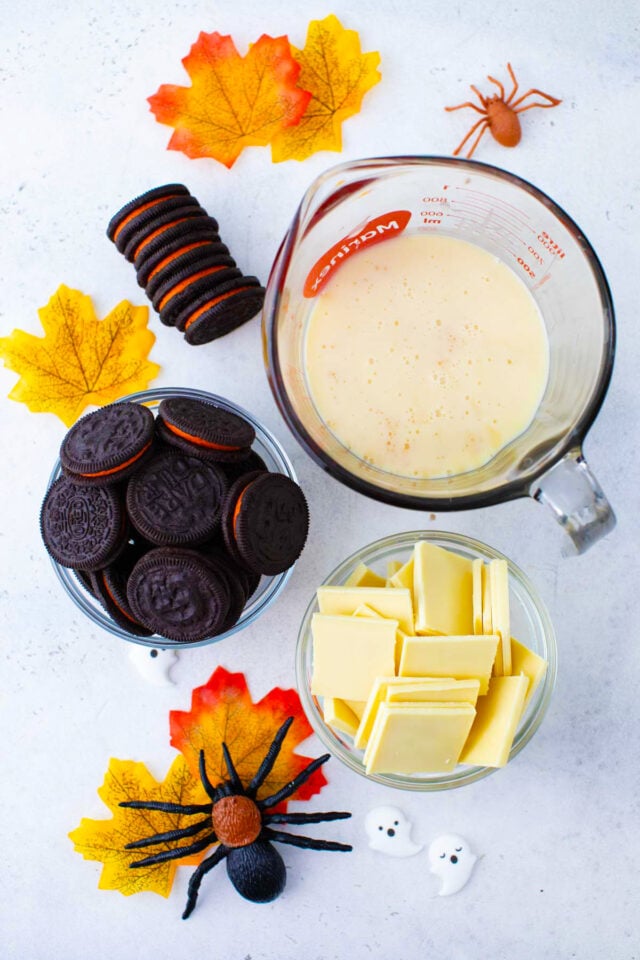
- Oreos – I used 20 original Oreo cookies, broken into pieces. Make them chunky by chopping them or crushing them in a baggie.
- White chocolate – For this, high-quality, rich white chocolate is essential since it is the main ingredient. I prefer Ghirardelli white chocolate bars chopped into chunks because I love the flavor.
- Condensed milk – Be sure to get sweetened condensed milk and not evaporated milk. I usually get the Eagle brand, which is 14 ounces, because it is rich, thick, and sweet.
How to make
Prepare the pan: First, I line an eight-inch pan with baking paper.
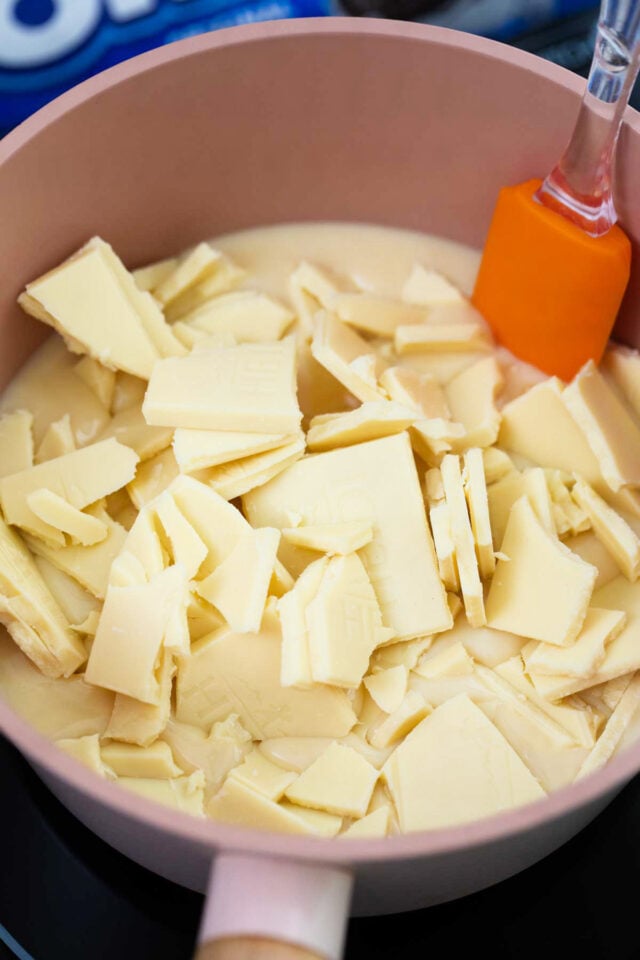
Melt the chocolate: Then, I heat the condensed milk and white chocolate in a large saucepan over medium-low heat. I stir the mixture continuously as it starts to melt. When it thickens and begins to pull away from the sides, I turn off the heat and set the saucepan aside.
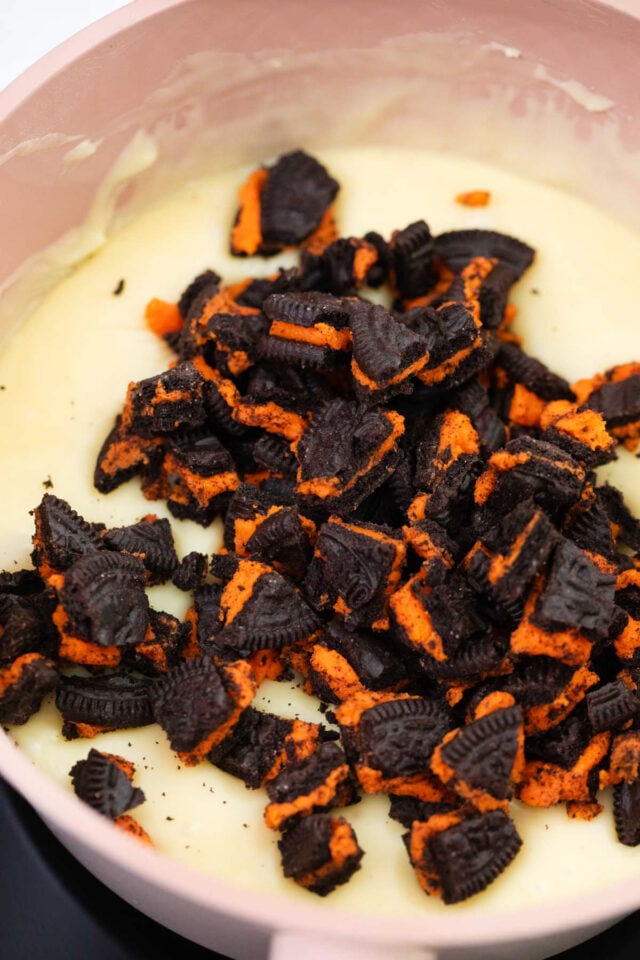
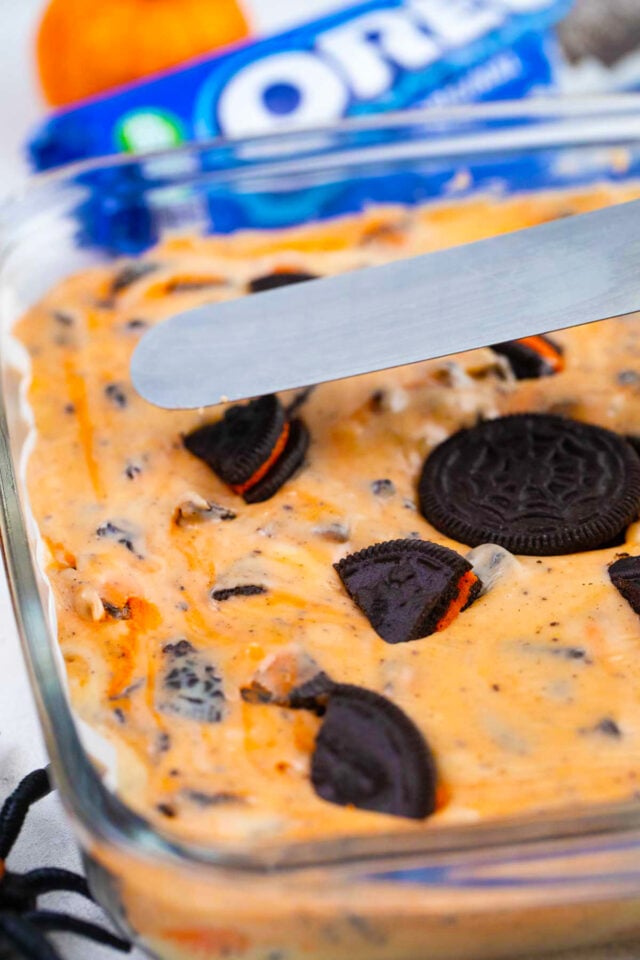
Fold: I add the Oreos, folding them until they are evenly distributed. Then, the mixture goes into the pan.
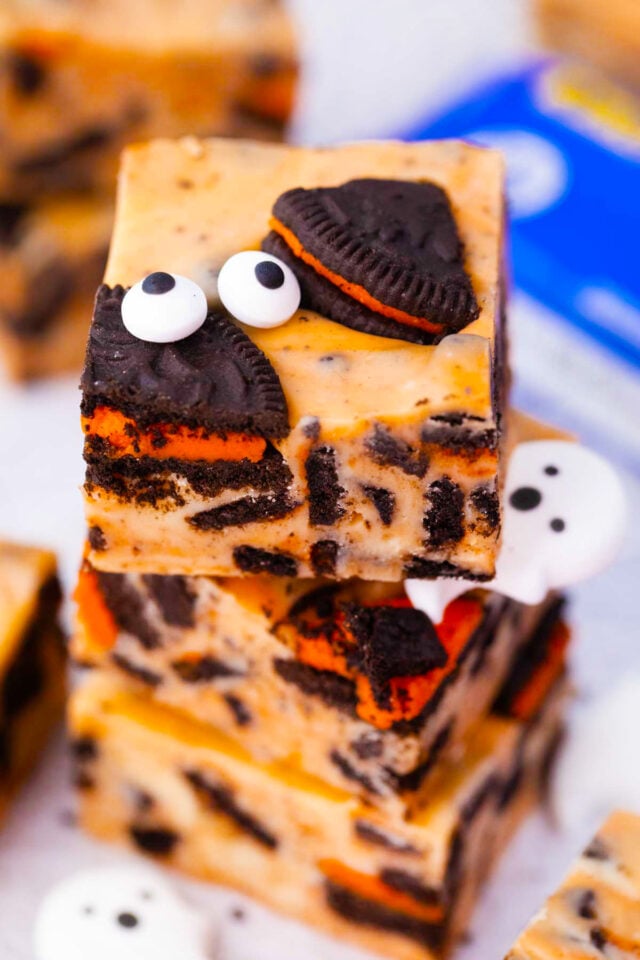
Chill the fudge: After chilling for three to four hours, it should be firm to the touch. I cut it into one-inch pieces and serve.
Expert tip
The proper way to melt chocolate
The first thing to remember when melting chocolate is to get the right kind of chocolate. I do not recommend chocolate chips. Nor do I recommend getting a Hershey candy bar, although that would work. High-quality melting chocolate bars are the best choice because they are specifically designed to melt smoothly, thanks to their higher cocoa butter content. Chocolate chips have ingredients that help stabilize their shape, which can impede the melting process.
For my fudge recipe, I use my favorite chocolate bars, which are Ghirardelli, and I chop them into small pieces. It melts in a large saucepan with a heavy bottom over medium-low heat with the sweetened condensed milk. I stir it constantly to prevent it from burning, as chocolate can burn or seize if it sits in one spot for too long.
One thing to note is that I always ensure the saucepan and work tools are dry to prevent the chocolate from becoming grainy or clumping. Another thing is to remember to take it slow. Do not turn up the heat to speed things up. It has to melt slowly to keep it from seizing up as well.
More tips to consider
- Be sure to use sweetened condensed milk instead of evaporated milk, or the fudge will never set properly.
- Also, opt for high-quality chocolate bars for melting, rather than chocolate chips. They have ingredients to help them keep their shape, which prevents good melting.
- Keep the pot and work area dry and dust-free. Water and dust can cause grainy fudge.
- Let the fudge chill for at least three hours; otherwise, it will not set properly.
- To melt the chocolate in the microwave, heat it at 50% power for one minute.
- Do not overcook it, or it will be hard and crumbly.
Recipe variations and add-ins:
- Other Oreos: I have made this yummy fudge with several other Oreo flavors, including orange and black Oreos, golden Oreos, peanut butter Oreos, Mint Oreos, and chocolate Oreos.
- Different flavors of chocolate: On a similar note, I have also used other colors of chocolate, including dark, milk, and orange.
- Caramel topping: Another time, I decided to add some of my caramel sauce on top of the fudge, and my kids really loved it. However, it was a little sticky.
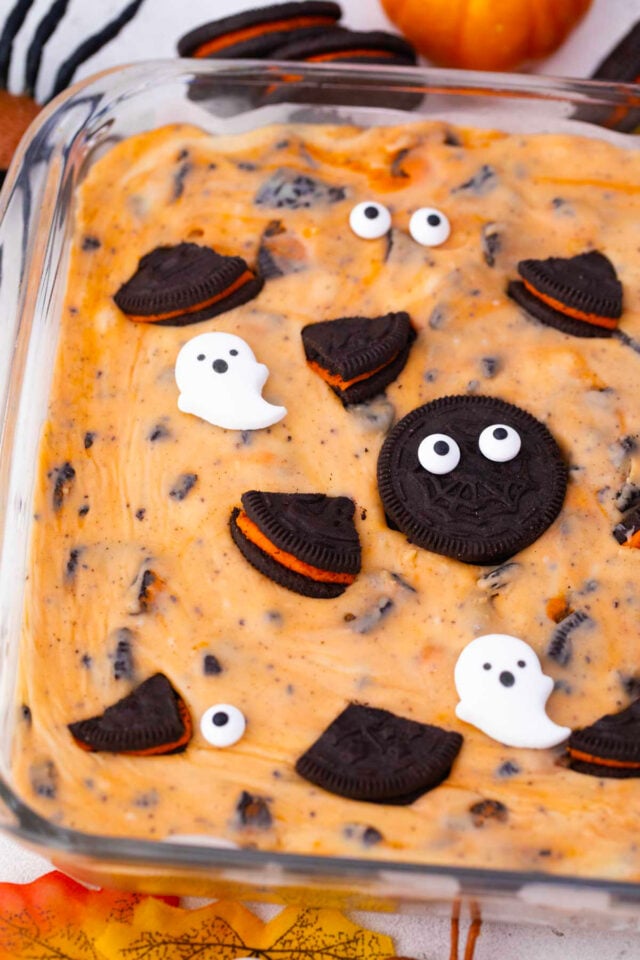
- Decorate the fudge: Since it is Halloween, I have also decorated my fudge several times with various spooky items, such as eyeballs, bats, skulls, and ghosts.
- Make it nutty: Add some crunch by tossing in some chopped pecans or walnuts.

Serving suggestions:
The fudge can be served chilled or at room temperature. I prefer it at room temperature because it has a smoother texture. This is a great treat to give to kids when trick-or-treating. For one of my kids’ Halloween parties, I served this fudge part of a themed dessert table along with Oreo witch hat cookies and Oreo turkeys.
Since usually everyone is busy checking their candies, I always include something for them to snack on. These pizza roll-ups are fun to make and to eat, and these cucumber sandwiches are the perfect finger food. Everyone loves these taco tortilla roll-ups; they are mess-free, hearty, and delicious!
How to store leftovers
- Refrigerate: Fudge can be left at room temperature for up to two weeks in a sealed container. If kept refrigerated, it can be kept for up to a month.
- Freezing: To freeze my fudge, I like to wrap it tightly in plastic to prevent freezer burn and then place it in a heavy-duty freezer bag. It can stay frozen for up to six months.
- Defrost: For the best texture and flavor, I thaw my frozen fudge in the refrigerator overnight.
Frequently asked questions
If it is cooked too long, the fudge can become overheated and crumbly. It loses too much water and does not hold together as it should. Be sure to take it out when it starts pulling away from the sides of the pan. It is possible to add some more sweetened condensed milk to it and see if that helps. However, if not, it will still taste delicious.
It may just need to chill for a longer time. It needs to be chilled for at least three hours. However, this may happen if evaporated milk is used instead of condensed milk. Make sure there is enough chocolate as well. Even if the fudge is frozen, it will never become hard, and it will not be as sweet as regular fudge if there is too little chocolate.
I do not like to do it that way, but it can be done. Just pour the sweetened condensed milk into a microwave-safe bowl and add the chopped chocolate. Please give it a good stir, then place the bowl in the microwave on 50% power for 30 seconds. Remove it, stir again, and cook on 50% power for an additional 30 seconds. Keep stirring until all the chocolate is melted. Be sure not to get any water in the bowl, or it will seize up.
Grainy fudge is typically caused by sugar crystals forming in the pot during the cooking process. This is often caused by water splashing into the chocolate or excessive stirring of the chocolate. If any water gets into the pan, it can cause crystallization, resulting in a grainy texture. The water turns into tiny crystals. Stirring too much can cause air bubbles or dust that can have the same effect, forming crystals in the chocolate as well.
More no-bake recipes

Sweet and smooth Halloween Oreo fudge is easy to make with just three ingredients, and fun to decorate with chopped Oreos and candy eyeballs.
- 14 oz can condensed milk
- 18 oz white chocolate chopped into chunks
- 20 Halloween Oreos broken into pieces
- Candy eyeballs
- Oreos
- Candy ghosts
- Sprinkles
-
Line an 8×82 baking pan with non-stick baking paper and set it aside.
-
Add the condensed milk and chopped chocolate to a large saucepan over low to medium heat.
-
Stir the mixture continuously until it thickens and becomes smooth. It should begin to pull away from the bottom and sides of the pan when stirred with a silicone spoon. If the mixture remains too runny, keep cooking it on low heat until it reaches the desired thickness.
-
Turn off the heat and remove the saucepan from the stove. Add the chopped Oreos and fold them using a rubber spatula until they're evenly distributed.
-
Pour the fudge mixture into the prepared pan and smooth the top.
-
Garnish it immediately with more chopped Oreos, candy eyeballs, sprinkles, and ghosts.
-
Refrigerate the Halloween fudge for 2 to 3 hours, or until it is set and firm. Cut into 2-inch pieces and serve. Enjoy!
The proper way to melt chocolate
The first thing to remember when melting chocolate is to get the right kind of chocolate. I do not recommend chocolate chips. Nor do I recommend getting a Hershey candy bar, although that would work. High-quality melting chocolate bars are the best choice because they are specifically designed to melt smoothly, thanks to their higher cocoa butter content. Chocolate chips have ingredients that help stabilize their shape, which can impede the melting process.
For my fudge recipe, I use my favorite chocolate bars, which are Ghirardelli, and I chop them into small pieces. It melts in a large saucepan with a heavy bottom over medium-low heat with the sweetened condensed milk. I stir it constantly to prevent it from burning, as chocolate can burn or seize if it sits in one spot for too long.
One thing to note is that I always ensure the saucepan and work tools are dry to prevent the chocolate from becoming grainy or clumping. Another thing is to remember to take it slow. Do not turn up the heat to speed things up. It has to melt slowly to keep it from seizing up as well.
Beth
This is so super cute! I love the colors, and I love how easy it is to make!